Hello Everyone,
I have been moving over the last couple of months so I have done no blogging or stamping for that matter. It has been a huge ordeal for me and took longer then I thought it would! I'm sad to say I had to pack up and store alot of my stamps/paper and accessory stuff too. I do have my current SU with me though and plan on posting to my blog as soon as I can! I've missed stamping and creating very much! Happy Thankgiving and Many Blessings~ Cherie
Saturday, November 17, 2012
Friday, August 24, 2012
Clockworks Birthday

Another card using Clockworks and Papaya Collage stamp sets. I added some faux stitching around the three DS panels and some sponging around the layers with Soft Suede ink. The Labels Framelit was stamped and then cut in half to fit on both sides of the ribbon.
Stamps: Clockworks, Papaya Collage, Curly Cute.
Paper: Very Vanilla CS, Raspberry Ripple CS, Fan Fair DSP, First Edition DSP.
Ink: Soft Suede, Rose Red, Old Olive, Crumb Cake.
Accessories: 1-1/4" Circle Punch, 1" Circle Punch, 3/4" Circle Punch, Big Shot, Labels Framelits, Rose Red Seam Binding, Dimensional, Paper Piercer, Essentials Mat Pack, White Gel Pen.
Wednesday, August 22, 2012
Time Flies Clockworks

For today's card I used a mixture of Papaya Collage, Clockworks stamps sets and Birds of a Feather DS paper. I used the ink colors in Birds of a Feather DS paper and printed the saying on the Computer in Brown ink. Dazzling Details added to the Butterfly Wings!
Stamps: Papaya Collage, Clockworks.
Paper: Whisper White CS, Baja Breeze CS, Birds of a Feather DSP.
Ink: Raspberry Ripple, Baja Breeze, Summer Starfruit, Soft Suede.
Accessories: Big Shot, Paper Doily Sizzlits L, Labels Framelits, Finishing Touches Edgelits, Baja Breeze Seam Binding, Dazzling Details, Rhinestone Basic Jewels.
Tuesday, August 21, 2012
Clockworks Color Splash

Clockworks and Teeny Tiny Wishes stamp sets! Simple card using three ink colors and a minimum of accessories! I used the ink on the inside of the lids to do the small amount of watercoloring with!
Stamps: Clockworks, Teeny Tiny Wishes.
Paper: Whisper White CS, Soft Suede CS.
Ink: Pool Party, Summer Starfruit, Soft Suede.
Accessories: 1-1/4" Circle Punch, 3/4" Circle Punch, 1/2" Circle Punch, Aqua Painter, Mini Silver Brads, Dimensionals, Paper-Piercer.
Thursday, August 16, 2012
Clockworks Collage

Clockworks stamp set mixed with Fan Fair DS paper!
I added things here and there until I liked it! I also again mixed Whisper White CS & Very Vanilla CS! Love that look!
Stamps: Clockworks, Teeny Tiny Wishes.
Inks: Raspberry Ripple, Summer Starfruit, Soft Suede.
Paper: Very Vanilla CS, Whisper White CS, Fan Fair DSP.
Accessories: Big Shot, Finishing Touches Edgelits, Apothecary Accents Framelits, 1-1/4" Circle Punch, Dimensionals, Basic Rhinestones, Sponge, Cherry Cobbler Seam Binding, Cherry Cobbler Baker's Twine.
Tuesday, July 31, 2012
Flowers at Sunset

One last scene card using Serene Silhouettes, brayer and some bleach!
I kinda messed this one up around the sun but saved it enough to use as a card I think! But we are always our own worst critics! I cut a long post-it to use as a mask for the hillls and sponged those adding Soft Suede just above them.
Stamps: Serene Silhouettes, Made By You.
Paper: Midnight Muse CS, Old Olive CS, White Glossy CS, Copy Paper.
Ink: Stazon Black, Summer Starfruit, Pumpkin Pie, Primrose Petals, Old Olive, Island Indigo, Midnight Muse, Soft Suede.
Accessories: Brayer, 1-1/4" Circle Punch, Sponge, Watercolor Brush, post-it notes.
Friday, July 27, 2012
Flowers in the Moonlight

For this card I sponged some Summer Starfruit ink through the middle of the panel first and then brayered Primrose ink on the bottom half. I then added Island Indigo ink around the edges toward the middle, applying very lightly through the middle and finished with Midnight Muse.
Each time I use my brayer on Glossy CS, I'm amazed at the different outcome. Each color added with different amounts of pressure on the brayer offers a different look each time! For these cards I used very light pressure on the brayer but rolled over the portion of CS as many times as it took to get a smooth, no line application. As in the other two cards, bleach painted around the flowers to highlight and dotted around the moon with a toothpick for stars!
I also used the punched out reverse circle mask to sponge some yellow where the shadow of the full moon would be.
Stamps: Serene Silhouettes, Made for You.
Paper: Midnight Muse CS, More Mustard CS, White Glossy CS, copy paper.
Ink: Summer Starfruit, Primrose Petals, Island Indigo, Midnight Muse, Stazon Black.
Accessories: 1-1/4" Circle Punch, Bleach, Watercolor Brush, Brayer, Sponge, post-it notes, toothpicks.
Thursday, July 26, 2012
Birds at Night

Another card using Serene Silhouettes, my Brayer and some bleach. This started out being Summer Starfruit, Pumpkin Pie and Primrose Petals with the circle mask over the Summer Starfruit at the top BUT I ended up going over it with Midnight Muse which gave it more of a glow and darker for night time. I like that you can still see some yellow and orange through the middle. I went back over the moon with some bleach then added a little Summer Starfruit. I also highlighted the birds and branches with bleach using a watercolor brush and again dotted some bleach around using a toothpick for stars.
Stamps: Serene Silhouettes, Made for You.
Paper: Soft Suede CS, Old Olive CS, White Glossy CS, Copy paper.
Ink: Stazon Black, Summer Starfruit, Pumpkin Pie, Primrose Petals, Midnight Muse.
Accessories: 1-1/4" Circle Punch, post-it notes, bleach, watercolor brush, Brayer, Sponge, toothpicks.
Wednesday, July 25, 2012
Trees in the Moonlight

Using Serene Silhouettes, my Brayer and some bleach I created a few scene cards...this is the first one. I used a toothpick to dot the bleach around the moon and used a watercolor brush to paint the tree branches with bleach as well.
A post-it was used to mask off the tree line and to create the moon mask.
The main image is framed with copy paper instead of CS to cut back on the weight with four layers!
Stamps: Serene Silhouettes.
Paper: White Glossy CS, Old Olive CS, Midnight Muse CS, copy paper.
Ink: Old Olive, Summer Starfruit, Island Indigo, Midnight Muse, Stazon Black.
Accessories: 1-1/4" Circle Punch, Sponge, Brayer, Black Starpie Fine point marker, Watercolor Brush.
Thursday, July 12, 2012
Shabby Floral Bday

I have been gone, my dad had surgery, a friend had surgery and my son left for the navy all in the last few days but I wanted to upload this card I made which is very similar to another card I did awhile back! I love the Apothecary Art and Elements of Style images together too!

Stamps: Apothecary Art, Elements of Style, Made for You.
Ink: Crumb Cake, Baja Breeze, Daffodil Delight, Old Olive, Lucky Limeade, More Mustard.
Paper: Very Vanilla CS, Whisper White CS, Shimmery White CS, Vellum CS.
Accessories: Big Shot, Square Lattice Folder, Apothecary Framelits, Finishing Touches Edgelits, Beautiful Wings Embosslit, Crochet Trim, Dimensionals, Basic Rhinestones, Dazzling Details Glitter, Sponge, Color Spritzer Tool.
Friday, July 6, 2012
Sweet Silhouettes

Today's card uses Serene Silhouettes and Itty Bitty Banners stamp sets!
The Essentials Paper-Piercing Pack makes it so easy to layer or create a mask for these Framelit shapes as I did here by piercing and then cutting out along the smaller pierced size in this shape. I used Vellum CS for this so I could line it up along the outer edge and sponge just the center part.
Again I mixed Very Vanilla and Whisper White CS for this look.
Stamps: Serene Silhouettes, Itty Bitty Banners.
Paper: Whisper White CS, Very Vanilla CS, First Edition DSP, Vellum CS.
Ink: Baja Breeze, Old Olive, Crumb Cake, Basic Black.
Accessories: Big Shot, Delicate Designs Folder, Apothecary Framelits, Doily die, Bitty Banners Framelits, Black Scallop Dots Ribbon, White Organza Ribbon, Basic Pearls, Sponge, Essentials Paper-Piercing Pack, Paper Piercer.
Thursday, July 5, 2012
Birds & Ruffles BD

Happy 4th of July! Hope everyone had a good one!
Simple Birthday card using lots of embossed texture and a little Designer paper!
Island Indigo ink used to stamp the Happy Birthday and sponge the edges of the insert placed in the Designer Frame. The bird cages were cut out of the Birds of a Feather DS paper. I really like the colors used in this DS paper!
Stamps: Beautiful Birthday
Ink: Island Indigo.
Paper: Island Indigo CS, Whisper White CS, Birds of a Feather DSP.
Accessories: Big Shot, Framed Tulips Folder, Delicate Designs Folder, Designer Frames Folder, White Organza Ribbon, Baja Breeze Seam Binding, Dimensionals, Sponge, Basic Rhinestones.
Friday, June 29, 2012
Postage Due Thanks

Postage Due and Lovely Little Labels Thank You using Travel Journal Wheel and Viola's Lace Wheel! Love these wheels which are in the 'Fan Fair' product suite as they go so well together! The yellow flower is a punched scallop circle in So Saffron CS, cut in a spiral and rolled on a wooden skewer to form the flower! The background paper is Birds of a Feather DS paper. The Summer Starfruit and lighter Island Indigo colors look so nice together! Everything stamped in Crumb cake ink....yummy!
Stamps: Postage Due, Lovely Little Labels, Viola's Lace wheel, Travel Journal wheel.
Paper: Very Vanilla CS, Crumb Cake CS, Birds of a Feather DSP, So Saffron CS.
Ink: Crumb Cake
Accessories: Crumb Cake Seam Binding, Big Shot, Bitty Banners Framelits.
Thursday, June 28, 2012
Postage Due Framed

Today's card uses Postage Due and Teeny Tiny Wishes stamp sets. The large collage image was stamped on both Vanilla and Shimmery White CS using Soft Suede ink. The vanilla piece was embossed using the Designer Oval Frame and then torn around the flower image and layered over the Shimmery White image. The flower was stamped and cut out and then layered over the Wide Oval punched insert in the frame to make it pop!
I was working on another project using this set and decided to frame the corners on this image using the 2cent postage stamp. I liked how it looked and thought I'd try it on this card.
I love mixing Vanilla and Shimmery White or Whisper White cardstocks for contrast!
The accent color on this card is suppose to be Raspberry Ripple which is the ink color used on the flower, however the CS I grabbed is Riding Hood Red not Raspberry....oh well!
The very end of the Banner Framelit is stamped with the postage stamp and layered over the center of the matching postage stamp to blend in!
Stamps: Postage Due, Teeny Tiny Wishes.
Ink: Raspberry Ripple, Gumball Green, Soft Suede.
Paper: Soft Suede CS, Shimmery White CS, Vanilla CS, Riding Hood Red CS.
Accessories: Big Shot, Fancy Fan Folder, Bitty Banners Framelits, Designer Frames Folders, Postage Stamp Punch, XL Oval Punch, Crumb Cake Seam Binding, 3/8" Soft Suede Taffeta Ribbon, Basic Pearls.
Friday, June 22, 2012
Birds of a Feather Papaya Collage

A late night card I made using Papaya Collage, Lovely Little Labels stamps sets and Travel Journal builder wheel. The bird in the bird cage was cut out of the Birds of a Feather DS paper. The background striped paper is from the same DS paper!
I love the little postage stamps from Lovely Little Labels and the punch that matches!
I did a little sponging with Soft Suede ink and mixed Whisper White, Very Vanilla and Shimmery White cardstocks together for this look! The cardstock in the middle of the frame is leftover textured Vanilla which I just happened to grab!
Stamps: Papaya Collage, Lovely Little Labels, Travel Journal wheel.
Paper: Crumb Cake CS, Shimmery Wt. CS, Whisper White CS, Very Vanilla CS, Birds of a Feather DSP.
Inks: Soft Suede, Crumb Cake, More Mustard, Primrose Petals, Old Olive, Baja Breeze.
Accessories: Big Shot, Framed Tulips Folder, Bitty Banners Framelits, Sponge, Baja Breeze Seam Binding, Little Labels Punch Pack, Dimensionals.
Tuesday, June 19, 2012
Cherries & Ice Cream

A Cherry on Top hostess stamp set! I inked up just the middle part of the 'plate stand' with More Mustard marker and stamped it to make the cone part and then stamped the top cupcake parts on top of each other....A giant ice cream cone!
I love using images differently then intended especially when the outcome works out like you want it to!
I used the Essentials paper-piercing pack to embellish the main images.
The cherries are stamped in Raspberry Ripple and Gumball Green.
Stamps: A Cherry on Top
Paper: Raspberry Ripple, Whisper White CS.
Ink: Raspberry Ripple, Gumball Green, Soft Suede, Primrose Petals, More Mustard, Pretty in Pink.
Accessories: Big Shot, Fancy Fan Folder, Apothecary Framelits, Mat. Paper-piercer, Essentials paper piercing pack, Dimensionals, Cherry Cobbler Seam Binding.
Saturday, June 16, 2012
A Cherry on Top Cake

New Hostess set...A Cherry on Top! I decided to use the 'stand' for a cake plate. I layered three Delicate Design embossed Shimmery White CS pieces on Chocolate Chip CS, cutting each layer down to resemble a tiered cake. The embossed layers are attached with Dimensionals on top of the Chocolate Chip CS. The cake stand was inked with both Primrose and Raspberry markers. The Birthday greeting was stamped on pink Twitterpated DS paper and cut out!
Simple card that was a little outside the box but still in the same theme as the set!
Stamps: A Cherry on Top.
Ink: Chocolate Chip, Raspberry Ripple, Primrose Petals, Gumball Green.
Paper: Shimmery White CS, Chocolate Chip CS, Pretty in Pink CS, Twitterpated DSP.
Accessories: Big Shot, Delicate Designs embossing folders, Cherry Baker's Twine, Dimensionals,
Bowl full of Cherries

Another card using 'A Cherry on Top' hostess stamp set! For this one I tried to think a little bit out of the box by turning the plate stand cover up side down to use as a cherry bowl. I stamped just the very bottom of the plate stand to use as the bottom of the 'bowl' then covered the 'bowl' with designer paper, textured CS and a strip of 1/8" Taffeta ribbon.
I stamped a bunch of cherries by inking the cherry stamp just at the very corner of my stamp pad and using a post-it rounded at the corner for masking then going back with the Gumball marker and drawing in a few stems. Way faster then inking the cherry stamp with markers.
I did mix up my 'reds' for this card! LOL....Framelit is Riding Hood Red as well as the stamped Cherries. The ribbon is Real Red Taffeta and the Baker's Twine is Cherry Cobbler but it all looks fairly good together with the last two reds being only very small amounts!
Stamps: A Cherry on Top.
Paper: Whisper White CS, Riding Hood Red CS, Midnight Muse CS, Twitterpated DSP.
Ink: Midnight Muse, Riding Hood Red, Gumball Green.
Accessories: Big Shot, Fancy Fan Folder, Apothecary Framelits, Crystal Effects, Cherry Cobbler Baker's Twine, Real Red 1/8" Taffeta Ribbon, Paper-piercer, Mat.
Friday, June 15, 2012
Summer Cottage Window

Cottage Window with a few added flowers! The Shelf is from Little Additions stamp set as well as the flower pots which are the lamp shade turned upside down from the lamp stamp! The flowers are from Cottage Window.
I started to watercolor some Summer Starfruit ink around the window and decided to sponge some on instead. I have to say....sponging using the new style pad is a little different, it takes some getting used to! Thus the sponge mark directly under the window...LOL!
Stamps: Cottage Window, Little Additions, Itty Bitty Banners.
Paper: Early Espresso CS, Shimmery White CS, Gumball Green CS, Summer Starfruit CS, Twitterpated DSP.
Ink: Early Espresso, Soft Suede, Bashful Blue, Old Olive, Pear Pizzazz, Baja Breeze, Cajun Craze, Primrose Petals
Accessories: Big Shot, Bitty Banners Framelits, Finishing Touches Edgelits, Aqua Painter, Sponge, Espresso Baker's Twine.
Thursday, June 14, 2012
Bird Silhouette Cottage Window

Simple card showing masking and the new paper-piercing pack as well as Cottage Window!
The Window was stamped in Early Espresso ink, water colored with Soft Suede ink. The Lovely window was masked off and the tree and birds from the new Serene Silhouettes set were stamped in Midnight Muse ink and then using Summer Starfruit, More Mustard and Primrose Petals inks, I sponged. inside the window.
Stamps: Cottage Window, Serene Silhouettes, Made for You.
Inks: Espresso, Suede, Midnight Muse, Summer Starfruit, More Mustard, Primerose Petals, Bashful Blue.
Paper: Primerose Petals CS, Shimmery White CS, Twitterpated DSP.
Accessories: Big Shot, Bitty Banners Framelits, Sweet Buttons Embosslits, Beautiful Wings Embosslits, Espresso Baker's Twine, Summer Starfruit Ribbon, Essentials Paper-Piercing Pack, Mat, Sponge, Paper-Piercer.
Wednesday, June 13, 2012
Sweet Cottage Window

I really like this new Cottage Window stamp set! I didn't notice until I cut this piece of Twitterpated DS paper for the background that the pattern on it matches the new Fancy Fan embossing folder! I'm so glad Twitterpated DSP was carried over to the new catalog....so versatile!
The window was stamped in Early Espresso ink as well as the tree branches and then colored with markers. I inked the flower swag from the Cottage Window set with markers, stamped it and cut it out to fit across the birthday banner. Framed with a few pearls, butterfly and the Finishing Touches Edgelit border strip make this a soft, sweet card!
Stamps: Cottage Window, Itty Bitty Banners.
Paper: Shimmery White CS, Twitterpated DSP.
Ink: Early Espresso, Soft Suede, Crumb Cake, Old Olive, Gumball Green, Primrose Petals, Bashful Blue.
Accessories: Big Shot, Label Framelits, Finishing Touches Edgelit, Bitty Banners Framelits, Beautiful Wings Embosslit, White Organza Ribbon, Basic Pearls, Sponge, Aqua Painter, Crystal Effects.
Tuesday, June 12, 2012
Cottage Window #1

Well I liked this as I was stamping it but got impatient when I got to the trim/floorboards and didn't line them up so they are crooked!....oh well! The curtains I drew in with my Sahara Sand marker which I don't like but I thought the whole thing was a great idea and when I saw this set called Cottage Window in the catalog, I knew I'd be making a scene or two with this...the possibilities are endless with this window! Too Fun I just need more patience next time!
I used Cottage Window and Little Additions stamp sets!
Check out the little pillows in the chairs...they are the new Lovely Labels tiny postage stamp punched out using Twitterpated DS paper! The Perfect Pillow!
Curtain Rod: Little Additions-hanging string?
Trim/Floorboards: Little Additions-shelf upside down inked with marker
Vase on table: Little Additions-lower half of lamp
Pillows: Labels Postage stamp punch
Wall Frames/Chairs/Table: Little Additions set
Flowers in Window: Cottage Window stamp
Bird in the Oval Frame: Cottage Window bird stamp inked with no legs
Inks: Midnight Muse, Soft Suede, Crumb Cake, River Rock, Bashful Blue, Primrose Petals, Raspberry Ripple, Baja Breeze, Espresso, Sahara Sand, Gumball Green.
Accessories: sponge for bottom carpet part in Baja Breeze, Post-it note for masking window.
Monday, June 11, 2012
Blossoms of Blue

Baja Breeze Stippled Blossoms. The main flower was masked off and stamped with the lace using Summer Starfruit ink. I love the lace image called Viola's Lace( pg.108) builder wheel, the same with the writing at the top of the circle...Travel Journal builder wheel (pg. 108) stamped in Crumb Cake ink.
The bottom of the circle was sponged with River Rock ink. I also really like the new Summer Starfruit color, especially as an accent color and it goes really well with River Rock too!
Stamps: Stippled Blossoms, Itty Bitty Banners, Viola's Lace Wheel, Travel Journal Wheel.
Paper: Whisper White CS, Baja Breeze CS, River Rock CS.
Ink: Baja Breeze, Lucky Limeade, Summer Starfruit, Crumb Cake, River Rock.
Accessories: Big Shot, Scallop Circle die, Bitty Banners Framelits, Fancy Fan Folder, Circle Cutter, Sponge.
Saturday, June 9, 2012
Vintage Blossoms

The Island Indigo blue was chosen to stamp the flowers in to match this Fan Fair DS paper! I used Soft Suede as a contrasting color for the second layer. I like Lucky Limeade for the leaves because it has some yellow to it which contrasts nicely with any blues....warm and cool colors together complement as a whole!
I used just three colors for these stamped layered framelits, stamping off for the first step to make the second step darker with the same color.
I'm just in love with this stamp set, loving the large looking rose image the best!
I added a little bit of sponging around the edges of all the layers with Soft Suede ink.
Stamps: Stippled Blossoms
Paper: Very Vanilla CS, Fan Fair DSP.
Ink: Soft Suede, Lucky Limeade, Island Indigo
Accessories: Big Shot, Fancy Fan Folder, Label Framelits, Trinket Brads, Vanilla Seam Binding, Dimensionals, Sponge, Stamp-a-ma-jig, Paper-piercer, Mat, Color Spritzer Tool .
Bleached Embossing

Fabulous You shoe embossed in white and painted with bleach and then colored with markers!
I like the Chevron Folder texture and black and white contrast together!
Stamps: Fabulous You, Apothecary Art.
Paper: Basic Black CS, Whisper White CS.
Ink: Versa Mark, Basic Black, Markers; Regal Rose, Calypso, Celery, Baja, Pool Party, More Mustard, Wisteria, Gumball Green, Pumpkin, Daffodil, Primrose.
Accessories: Big Shot, Chevron Folder, Large Scallop Edgelit, Delicate Designs Folder, Finishing Touches Edgelit, Heat Gun, White Embossing Powder, White Baker's twine, Itty Bitty Shapes Punch, Basic Rhinestones, Crystal Effects, Watercolor Brush.
Friday, June 8, 2012
Postage Due Collage

This card features the new set Postage Due...so very collage! Love it!
The background is all paper from the Fan Fair DSP! I love the Fan Fair product suite too! The product suites in the new catalog are so fabulous and they interchange very nicely as well!
This was very easy, thanks due largely to the paper! I used both Whisper White and Very Vanilla cardstocks, sponging the stamped images with Soft Suede ink to blend them to the DS paper. The three small little stamps are from Lovely Little Labels set. The Island Indigo flower was stamped separately, cut out and added with a dimensional. The two postage stamps were stamped on the Fan Fair paper and punched out with the Postage Stamp punch.
Stamps: Postage Due, Lovely Little Labels, Itty Bitty Banners.
Paper: Whisper White, Vanilla, Fan Fair DSP.
Ink: Soft Suede, Crumb Cake, More Mustard, Island Indigo, Riding Hood Red.
Accessories: Big Shot, Finishing Touches Edgelit, Postage Stamp punch, Little labels punch pack, Cherry Cobbler seam binding, Sponge, Dimensionals.
Layered Beautiful Birthday

Lacy and very feminine using the lace paper from Fan Fair DS paper and a lovely Whisper White Delicate Designs Texture Border. The 3-D roses I had on hand that I made from the Scallop Circle and Fancy Flower punches with Pink Pirouette CS. To make the flowers: Cut around the punched shape in a spiral to the center then roll the spiral on a wooden skewer and remove. Position the petals and glue the bottom to the layers. I know there are lots of tutorials out there on paper flowers, these are the rolled version.
The leaves are Celery CS using the Bird Builder punch!
Simple card with pre-made flowers showing the Beautiful Birthday single stamp!
Stamps: Beautiful Birthday
Paper: Whisper White CS, Fan Fair DS paper, Pink Pirouette CS, Celery CS.
Ink: Early Espresso.
Accessories: Big Shot, Apothecary Framelits, Lg. Scallop Edgelit, Delicate Designs Folder, Mat, Essentials Paper-Piercing Pack, Pretty in Pink Tafeta Ribbon, Dazzling Details.
Thursday, June 7, 2012
Primrose Fabulous You

Another card using Fabulous You set! Embossed in white and water colored which shows off the details so well! I paired this one with the new Made for You set "happy birthday"
Both Apothecary Accents frames were die cut in whisper white cardstock. To get the larger shaped mats behind them, I used the new Essentials paper-piercing mat on Primrose cardstock and pierced around the outer most edge and then cut along the pierced dots to get the larger frame! What a handy dandy tool that is, not only can you use them for paper piercing but to make frames for your die cuts too!

After embossing the heel in white I used ink from the Primrose pad to water color the shoe making the edges and a few of the flower centers darker!
Stamps: Fabulous You, Made for You.
Paper: Primerose Petals, Whisper White, Fan Fair DSP.
Ink: Primrose Petals, Versa mark
Accessories: Big Shot, Fancy Fan Folder, Apothecary Framelits, Lg. Scallop Edgelit, Delicate Designs Folder, Mat, Essentials paper-piercing pack, Heat Gun, White Embossing powder, Aqua painter, Rose Red Seam Binding, Itty Bitty shapes punch, Basic Pearls
Stippled Rose Birthday

For this card I stamped the Rose, Rosebud and Leaves from the Stippled Blossoms stamp set on a piece of beautiful Fan Fair lace DS paper! The Beautiful Birthday single stamp was stamped on more Fan Fair DS paper and layered along with Whisper White Scallop Trim.
The single Beautiful Birthday stamp (pg. 44 main catalog) is so pretty and perfect for any card!
I love anything Vintage looking, aged and especially collage looking so I tried to incorporate the stippled blossoms into a collage theme for this card...well sort of managed it a little!
For the 2-step flowers the first step was inked with Primrose Petals ink and stamped off on scratch paper first before stamping on the lace paper so it would be a little lighter. The second part was stamped with Cherry Cobbler.
Stamps: Stippled Blossoms, Beautiful Birthday, Travel Journal wheel (pg. 108)
Paper: Primrose Petals CS, Whisper White CS, Fan Fair DSP
Ink: Primrose Petals, Cherry Cobbler, Celery, Old Olive, Early Espresso, Crumb Cake.
Accessories: Scallop Trim Border Punch, Rose Red Seam Binding, Basic Pearls, Cherry Cobbler Baker's Twine, Big Shot, Delicate Designs impressions folder, Large Scallop Edgelit.
Wednesday, June 6, 2012
Stippled Blossom

I had to post another card today, I'm having so much fun with my new stamp stuff....I want to share!
This background and focal Apothecary Framelit are all stamped with the new Stippled Blossoms stamp set! This set is so nice too, I always get the 2-step rose sets and I saw this set and knew I had to have it!
I also found both my old Regal Rose and Pretty in Pink stamp pads difficult to ink images with so I replaced both of those pads with the new foam pads and WOW! You can see how vivid and nice these stamped images are with the new pads! I have to say....I will be replacing a few pads in my collection which I hadn't planned on doing but are so worth it after trying out these new style pads, especially as I find myself not using some of those colors because the pad is inadequate!
I also added to the main focal point the Travel Journal builder wheel after masking the rose, I love this wheel and it works well on it's own for a subtle bit of writing to add to a background.
Stamps: Stippled Blossoms, Itty Bitty Banners, Travel Journal wheel.
Paper: Whisper White CS, Shimmery White CS, Gumball Green CS.
Ink: Regal Rose, Pretty in Pink, Gumball Green, Crumb Cake
Accessories: Big Shot, Fancy Fan Folder, Large Scallop edgelit, Bitty Banners Framelits, Apothecary Framelits, in-color Brads, Stamp-a-ma-jig, Crystal Effects.
Fabulous You Shoe

I love this time of year when I can play with new catalog stamp sets, colors and accessories! This new catalog set is called Fabulous You...set of three... the shoe, saying and little butterfly! Too Cute! I loved the little In-color Dahlia on the shoe, it gives it a 3-D look! Also playing around with the new Fancy Fan embossing folder and Delicate Designs impressions folder! This card shows all new products except for the Vanilla CS and a few markers!
Stamps: Fabulous You
Paper: Primrose Petals CS, Vanilla CS
Ink: Basic Black, Primrose Petals, Markers; Celery, Gumball, Old Olive, Primrose, Raspberry, Starfruit, Saffron, Pool Party, Pink Pirouette
Accessories: Big Shot, Fancy Fan Embossing Folder, Large Scallop edgelit, Delicate Designs impressions folder, Summer Starfruit 3/8" stitched ribbon, in-color Dahlias, Dimesionals, Crystal Effects.
Thursday, May 24, 2012
Frame with a View

Today's card uses primarily Pool Party with accents of Primrose Petals, Gumball Green and Soft Suede inks! I inked the flowers with Primrose and Gumball markers and stamped them. I masked the flowers and stamped the frame in Soft Suede then cut out the center of the frame and stamped En Francais on Whisper White CS to place behind the frame. The flowers were then sponged with Primrose ink. They look much more red in the picture then they really are! I added the little Doily stamp at the bottom from the Kindness Matters set using Pool Party ink and then sponged around the other three edges with Pool Party ink as well on that layer.
I am loving this new set- Papaya Collage!
~Stamps: Papaya Collage, En Francais, Apothecary Art, Kindness Matters.
~Paper: Shimmery White CS, Whisper White CS, Pool Party CS.
~Inks: Soft Suede, Pool Party, Primrose Petals, Gumball Green.
~Accessories: Rose Red Seam Binding, Basic Pearls, Crystal Effects.
Wednesday, May 23, 2012
Unique Birthday

Another Sneak Peek at the Papaya Collage stamp set and the new in-colors! I used just the new in-colors on this one and added some texture to the cardstock and the Denim Jean Ribbon which went with these colors pretty darn well! The frame is stamped in Primrose Petals ink, the small scroll frame in the upper corner with the circle center is stamped in Raspberry Ripple with a 3/4" circle punched from Summer Starfruit in the center.
~Stamps: Papaya Collage, Something to Celebrate.
~Paper: Primrose Petals CS, Summer Starfruit CS, Raspberry Ripple CS, Whisper White CS.
~Inks: Gumball Green, Midnight Muse, Primrose Petals, Raspberry Ripple, Summer Starfruit.
~Accessories: Bigshot, Adorning Accent Folder, Perfect Pokla Dots Folder, Adorning Accents Edgelit, Denim Jeans Ribbon, 3/4" Circle Punch, Basic Rhinestones, Post-it notes for masking.
Tuesday, May 22, 2012
Sneak Peek-Papaya Collage

What a great new set called Papaya Collage which will be available in the new catalog starting June 1st!
I used the new in-color inks along with a little Soft Suede and Pool Party! The background cardstock is Summer Starfruit and Whisper White! I love how well the Rose Red Seam Binding ribbon goes with both the new in-colors Primrose Petals and Raspberry Ripple! This new set is just dynamite!
~Stamps: Papaya Collage, Apothecary Art.
~Ink: Gumball Green, Midnight Muse, Primrose Petals, Raspberry Ripple, Summer Starfruit, Pool Party, Soft Suede.
~Paper: Whisper White CS, Summer Starfruit CS, Shimmery White CS.
~Accessories: Big Shot, Stripes Embossing Folder, Rose Red Seam Binding, Basic Rhinestones, Sponge.
Monday, May 21, 2012
Tall Flower Garden

Another No layer card using a mixture of Just Believe stamp set and Baby Blossoms (retired) stamp set which I love and continue to use in spite of being discontinued! Butterfly is from Clearly for you stamp set!
~Paper: Whisper White CS.
~Inks: Pear Pizzazz, Old Olive, Blushing Bride, More Mustard, Peach Parfait, Daffodyl Delight, Calypso Coral, Marina Mist, Indigo, Black.
Friday, May 18, 2012
Celebrate Spring

I was so inspired by Bonnie's ( bon2stamp) card that I had to create a few of my own with the same idea but different flower stamps!
Another NO layer/NO accessories card using Just Believe and Baby Blossoms stamp sets.
A few little blossoms were added from the Baby Blossoms set. The stems were drawn to the flowers with the Pear Pizzazz marker! I love to add little details with the fine point of the marker too, like adding a tiny bit of shading to the middle of the flowers.
These cards are so sweet, simple and fun to make!
~Paper: Whisper White CS
~Markers: Pear Pizzazz, Old Olive, Pretty in Pink, Pink Pirouette, Baja Breeze, More Mustard, Basic Black.
Thursday, May 17, 2012
Framed Flowers

I was playing around with my Just Believe set and decided to add a few flowers from the Baby Blossoms stamp set to enhance it a bit! I also wanted to make a few simple cards with no layers or accessories for easy sending!
~Inks: Pear Pizzazz, Old Olive, Daffodyl, Mustard, Blushing Bride, Peach Parfait, Basic Black.
~Paper: Whisper White CS
Wednesday, May 16, 2012
May Class Technique Card

May Technique Card using Upsy Daisy stamp set and En Francais background stamp. Technique called Random Coloring by Technique Junkies!
Awe all my silhouette stamps are retiring BUT there is a new one I love coming out in the new catalog called Serene Silhouettes....can't wait to get my hands on it too!
Friends stamp is from Just Believe stamp set.
~Paper: So Saffron CS, More Mustard CS, Shimmery White CS, Domestic Goddess DSP.
~Ink: Markers; So Saffron, Daffodyl, More Mustard, Peach Parfait, Pear Pizzazz, Wild Wasabi, Garden Green, Artichoke, Stamp Pads; More Mustard, Baja Breeze, Old Olive.
~Accessories: Scallop Edge punch, Water mist bottle, 1/16" Circle punch, Vintage Trinkets, More Mustard Scallop Dots Ribbon.
Friday, April 6, 2012
Stand Up Pop-up Card

Stand Up Pop-up card sample using Rue Des Fleurs Set with Twitterpated DSP! For this card I used Stampin' Write Markers to match the colors in the paper!
~Stamps: Rue Des Fleurs.
~Paper: Lucky Limeade CS, Whisper White CS, Basic Gray CS, Riding Hood Red CS, Twitterpated DSP.
~Ink: Basic Gray, Riding Hood Red, Blushing Bride, Lucky Limeade, Baja Breeze.
~Accessories: Baja Breeze Seam Binding, Boho Blossoms Punch, Bird Builder Punch, Basic Pearls, Lace Trim, Simply Scored Tool, Sticky Strip.
Thursday, April 5, 2012
Double Masking 2

Another Card using the Double Masking Technique! I used the same ink colors for this card just different stamp sets!
~Stamps: Forever Young, Parlor Prints, Teeny Tiny Wishes.
~Paper: More Mustard CS, Basic Black CS, Glossy White CS.
~Ink: Stazon Black, Crumb Cake, Melon Mambo, Pumpkin Pie, Daffodil Delight.
~Accessories: Big Shot, Label Framelit die, 1-1/4" Circle Punch, Modern Label Punch, Word Window Punch, 1/16" Circle Punch, Black Scallop Ribbon, Black Brads, Snail Adhesive, Sponges, Copy Paper.
Wednesday, April 4, 2012
Double Masking Technique

This class card shows off the Double Masking Technique by Technique Junkies!
I needed more of a silhouette stamp but wanted to use this stamp set so I colored in the lighthouse with a sharpie marker.
~Stamps: Uncharted Territory, Texture Wheel.
~Paper: Glossy CS, Whisper White CS, Basic Black CS
~Ink: Stazon Black, Melon Mambo, Pumpkin Pie, Daffodil Delight, Crumb Cake.
~Accessories: Big Shot, Label Framelit die, 1-1/4" Circle punch, Modern Label punch, 1/16" Circle Punch, copy paper, Sponges, Gold Brads, Snail adhesive, Black Sharpie Marker.
Friday, March 16, 2012
Crumb Cake Birthday

I decided to color this Apothecary Art image different, using an unnatural color for the flowers and adding an image I cut out from the Antique Attic DS Paper. I added some more DS paper above the ribbons on the background too to give it some interest. Just something different!
~Stamps: Apothecary Art, Delicate Doilies.
~Paper: Whisper White CS, Antique Attic DSP, Crumb Cake CS, Soft Suede CS.
~Ink: Crumb Cake, Stazon Black, Celery, Old Olive, Blushing Bride, Soft Suede.
~Accessories: Big Shot, Framelit Label dies, Crumb cake Seam Binding, Suede Tafeta ribbon, Aqua Painter, Sponge, Everyday Enchantment Brad, 1/16" circle punch.
Thursday, March 15, 2012
Soft Faux Tile

Faux Tile Technique using post-it notes to mask the squares and sponge around the edges of each square. Love this soft collage look! I used Calypso Coral but stamped off first on scratch paper to get a softer Coral!
~Stamps: French Foliage, Nature's Nest, Curly Cute.
~Paper: Vanilla CS, Twitterpated DSP.
~Ink: Pool Party, Pear Pizzazz, Calypso Coral, Soft Suede.
~Accessories: Big Shot, Framelits Label die, Everyday Enchantment Brad, Sponge, Simply Scoring Tool, Pool Party Seam Binding, Post-it notes.
Wednesday, March 14, 2012
February Technique Sample

This card shows off a technique, the SAB Paper, Ribbon & Brads and uses the Mixed Bunch set with the matching Punch!
The Background technique for this card is called Texture Transfer by Technique Junkies! I used the ink colors to match the Everyday Enchantment DSP. All the edges are sponged with Soft Suede ink!
~Stamps: Mixed Bunch (Occasions Mini) Fresh Vintage (SAB) Perfectly Penned.
~Paper: Vanilla CS, Everyday Enchantment DSP.
~Ink: Poppy Parade, Calypso Coral, Lucky Limeade, Soft Suede.
~Accessories: Blossom Punch, 1" Circle Punch, 1/16" Circle Punch, Bird Builder Punch, Sponge, Everyday Enchantment Brads & Ribbon, Dimensionals.
Thursday, January 26, 2012
Concertina Fold #3
My plan was to post this earlier in the week but my dad had an emergency quadruple bypass on Monday so needless to say I have not been home much or stamping for that matter. He is doing fantastic though!
So this is the third Concertina Fold card I made using Take it to Heart stamp set again! I wanted to stick with the blues in this paper, mixing white and vanilla for contrast! Who says Valentines can't be blue or any color for that matter!

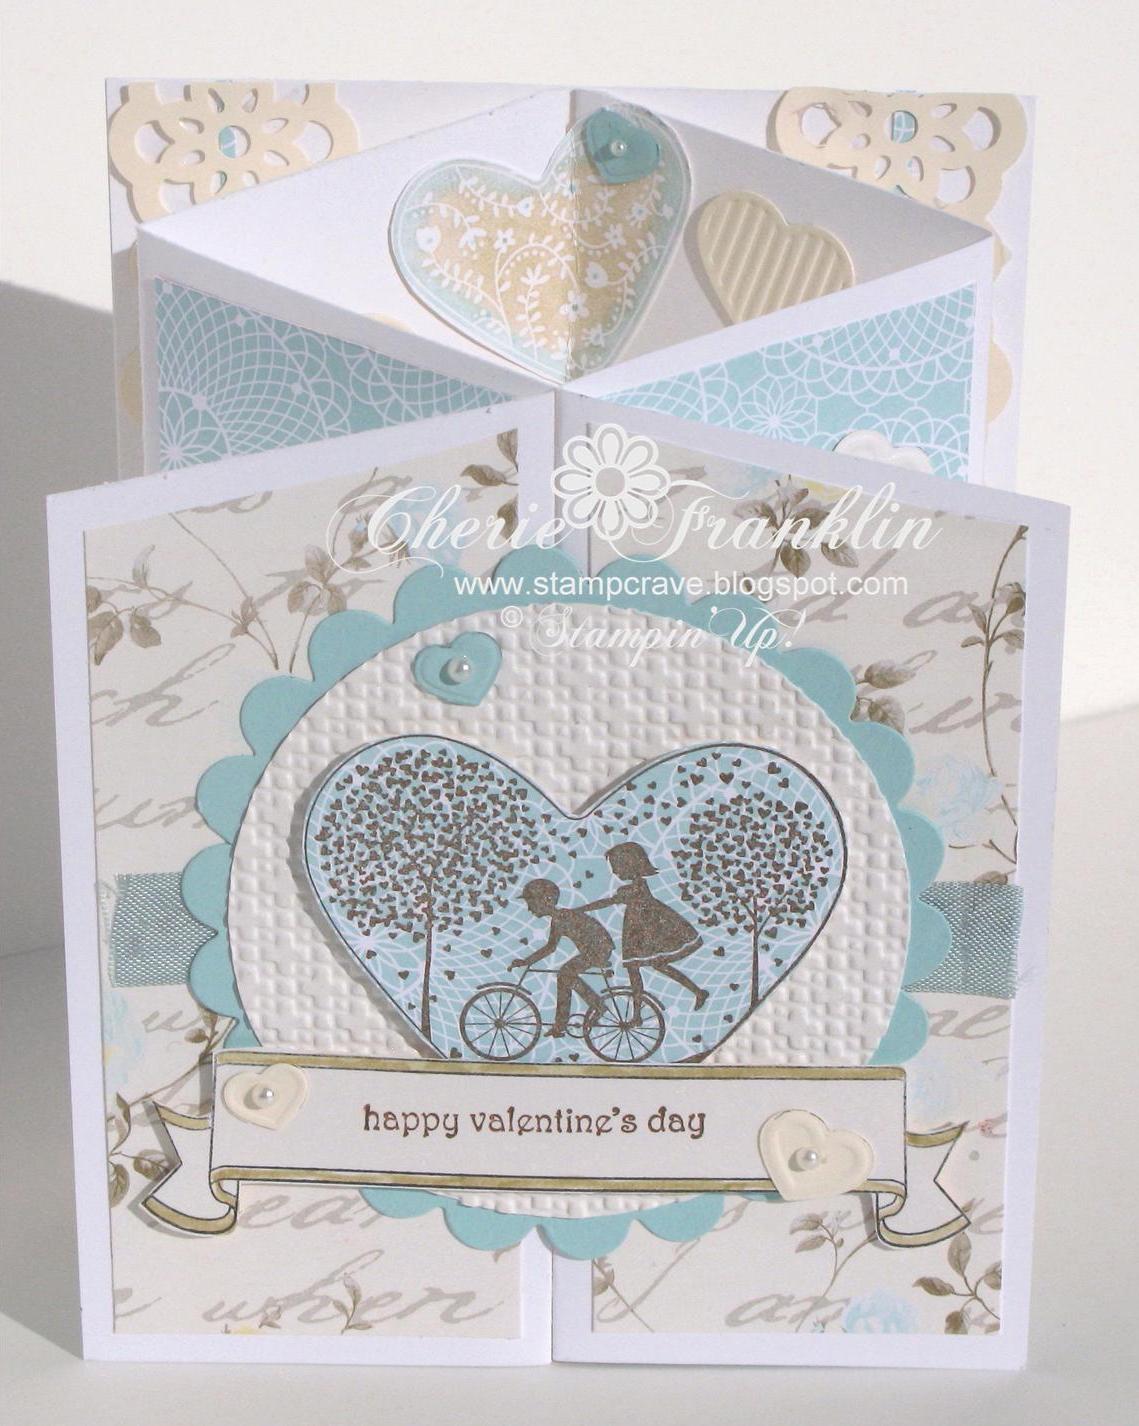
Tuesday, January 17, 2012
Concertina Fold With Love

For this concertina fold card I used stamped pieces of cardtsock instead of designer paper to layer on the middle folds. I stamped the large heart with the bird in a light ink and then cut it out and flipped it over to stamp on because I don't have the heart framelits dies yet! I used the Curvy Borders technique to create the heart border around the large heart with the Heart Pinking Border Punch...love that technique by technique junkies!
All Cherry Cobbler ink and cardstock, Vanilla CS and Sahara Sand ink. Fashionable Hearts die, Take it to heart stamp set and Hand-Penned Holidays stamp set.

Concertina Fold Directions:
two 8-1/2" x 5-1/2" cardstock pieces
one 4-1/4" x 5-1/2" cardstock panel
Glue or sticky strip
Score tool
Small paper cutter
Ruler
1. Score each of the two pieces of cardstock at 2-1/8" along the long side. You should have 3 score lines each at every 2-1/8"
2. Measure and mark 1" in... at the bottom of each scored cardstock pieces. Either end can be the bottom because the score lines are evenly spaced across each piece.
3. Place the first score line in... on each piece at the edge of the paper cutter channel and the bottom end where the one inch mark was made on the paper cutter channel and cut. Each piece should have an angled cut along the three scored sections going from the first score line to 1" in at the bottom.
4. Punch along the angled top part all the way across as seen above and fold each... valley fold then mountian fold then valley fold. If you are using DS paper then adhere it along the 4-1/4" top part of the one CS panel. Then glue or sticky strip the underside of each of the top valley folds (the uncut 2-1/8" section) and adhere to the panel. The folds should meet in the middle or down the center of the panel butting up against each other .
5. To finish...The front last and shortest folds need a focal point adhered to hold them together and make the card stand with the accordion folds showing. The heart on this card is centered to hold both sides together.
6. Embellish and fold flat to send.
Hopefully I can put a video tutorial together soon so check back!
Monday, January 16, 2012
Concertina Fold Valentine

I wanted to do a concertina fold card that would meet in the middle but fold flat for mailing so I came up with this card which is very simple to make and uses one sheet of cardstock and a quarter sheet cardstock panel.
I was going to make a video tutorial but won't have time to do that so I will post the directions some time this week so check back if you want the directions for my version of a concertina fold card!

Stamps used: Take it to Heart.
Paper: White CS, Shimmery CS, Vanilla CS, Pool Party CS, Antique Attic DSP.
Ink: Stazon Black, Poppy Parade, Pool Party, Pear Pizzazz, Lucky Limeade, Soft Suede, River Rock, Blushing Bride, So Saffron, More Mustard & Crumb Cake.
Accessories: Big Shot, Framelit Dies, Polka Dot Folder, Fashionable Hearts Die, Eyelet Border Punch, Pool Party Seam Binding, Crystal Effects, Cherry Cobbler Dazzling Details, Aqua Painter.
Subscribe to:
Posts (Atom)


