Wednesday, March 31, 2010

PCS Blog Hop and Sneek Peek!


The Paper Crafters Sampler Design Team has an all new Blog Hop and Sneek Peek for our April Issue!
If you are just starting here or have just come from Tiffany Bauer's Blog~ Welcome!
The April Theme is 'Winged Things' and below is a sneek peek of one of my projects for this month! With all the different paper flower craze, I was so excited to share these super cute Tiny Paper Roses! They are so fun and easy to make too! Check out the April Issue of PCS and get detailed instructions for projects and cards including these tiny roses! Don't forget to mention me~ Cherie or use code PCSCF


The Design Team members were also given a challenge to offer our own spin on the fabulous 'Lantern' Pattern designed Exclusively for the April issue. I know you'll just love all the wonderful creations you see on our blog hop! If you are interested in creating these projects click on the PCS above for more information!


This is our Fabulous Lantern and my take on this project was quite different from the others but I had so much fun creating this! I used Jackpot DS paper for the lantern base and then made panels using Vellum CS. I stamped on the inside of the panels and added ink using markers and direct to paper with the stamp pads! I stamped and embossed the teapot from Dream Gardens Stamp set using gold powder on Basic Black C/S. I cut those out and attached them to form a ring that sits on the top of my lantern!
Thanks for visiting me and enjoy the blog hop! click below to hop over to Andrea's fabulous creations!

Collage Crystal Ornament

Over the years I've made gifts for my boys teachers, especially for Christmas. These cut Crystal Chandelier pieces are perfect for collage! They are flat on the back and come with a beading pin attached to a smaller round cut crystal as shown below. I got the idea years ago from a friend who buys old Chandeliers and makes jewelry out of the crystal pieces. They are so pretty in the light and can be used as ornaments or just hanging in the window to add to the decor! They are so easy to make and very inexpensive. These larger crystals (shown above) were about $1.99 a piece and the smaller ones were about a dollar. 
I started collecting vintage looking Christmas cards and paper and then added some Vintage transparencies to my collection. I would sit and make several at a time and then cover the back with decorative paper and sign my name. After layering or stamping the main image together, I traced around the crystal on double sided sticky sheets and cut out to attach the images to the crystal. I usually would use beading pins and insert them throught the hole at the top and attach colored crystal beads and beading caps over the front hole as shown on the smaller ornament below with a hook for hanging. Stamped backgrounds work excellent and 2 crystals could be attached back to back to create a 3-d look!

Garden Circle

Today's Card uses the Bella Toile Background stamp. The cut out Shimmery White Circle is stamped using Basic Black and then colored with the watercolor pencils and a blender pen. I love to mix it up a bit and use different coloring tools rather then rely on one way of coloring all the time! The Card base is Chocolate Chip and the background papers are from the Sweet Pea Paper Pad. The med. Scallop circle was cut out using the Big Shot and the Scallop Circle # 2 die with Rose Red C/S. Vintage brads and a greeting punched out with the small oval complete this nice simple card!

Vintage Time

I love this Clock face! This set is called Sense of Time. I stamped the clock face on Sweet Pea paper with Chocolate Chip Craft ink and embossed it with clear powder. All the edges are sponged with Chocolate craft ink as well! The Medallion Background stamp is so lovely just stamped with a single color but I love to ink it up along the edges with one color and then add in more colors by sponging them directly on the rubber overlapping the colors. This gives the image such a nice look when stamped!
The stamped piece is Very Vanilla C/S layered on Real Red C/S layered on Taken with Teal Card base.
Houndstooth is also from Sweet Pea paper pad. The greeting is stamped on Vanilla C/S.
I stamped the various images using Real Red, More Mustard, Taken with Teal and basic black inks. The Sanded Background was stamped on all the pieces using Sahara Sand classic ink. I used the assorted clips and red satin ribbon to complete the card!


Tuesday, March 30, 2010

Circle Black Magic

I wanted to use up a few of my scallop circles I had previously cut out to make room in my container. I need to do a little spring cleaning to make some room! For this card I agian used the Sweet Pea Paper Pad as background with a med. size scallop circle cut out with So Saffron C/S. The circle inside is Chocolate Chip C/S stamped with White Craft ink using the Inspired By Nature set and then colored over the white ink with watercolor pencils. The Photo corners are punched out with Chocolate Chip C/S and the stitched lines drawn with the White gel pen. The scallop circle dots were done with the fine point end of my Chocolate Chip marker. Chocolate chip stitched ribbon completes this card on a Chocolate Chip base card. This is a great class card or Stampers Ten group technique!  

Friday, March 26, 2010

Paper Crafters Sampler

Need workshop or gift ideas? The Paper Crafters Sampler has a fantastic design team using all Stampin'Up! products and creating unique projects and ideas for every issue! As a design team member I am so excited about the April Issue coming soon! With so many wonderful projects featured, I'm excited to show you my tiny paper roses that are so easy to do and will add that extra 'wow' to any project!
Sign up today and use my code PCSCF or mention me~ Stampcrave or Cherie Franklin
You'll be so glad you did!    Sign up here!

Thursday, March 25, 2010

Baby Boy Card

I used the Cute and Cuddly Stamp set for this card.
 Background paper-Welcome Neighbor SAB paper pack. I have used this paper so much and as the Sale-A-bration event comes to an end soon, I won't be using it anymore. So sad because I love the soft subtles colors, this paper is so versatile too!
Paper: Very Vanilla C/S, Whisper White C/S.
Inks: Bashful Blue, Basic Brown, Creamy Caramel and Blush Blossom marker.
Accessories: 1" Circle punch, Designer Label punch, Flower Trio punch, 1/4" Circle punch, Bashful Blue Satin Ribbon, Vanilla Label Hardware, sponge, Saying is from Teeny Tiny Wishes stamp set.
All the edges were sponged with Creamy Caramel!

Wednesday, March 24, 2010

Masculine B-Day

I very simple card, I inked up the stamp with markers and stamped it on Whisper White C/S then used a sponge to fill in the sky and ground. I attached the Large Brown Brads on each side of theVellum greeting and then stamped the little leaf and colored it with markers. I used the 1/2" circle punch to punch out each leaf anf sponged around it with Creamy Caramel and Close to Cocoa ink then attached it to the top of each brad.
Card Base: Brocade Blue, Next layer is Chocolate chip DS paper. The layer behind the main image is Nouveau Chic DS paper. The Markers used are: Chocolate Chip, Green Galore, Old Olive and Certainly Celery. The Stamp Pads Used for the background are: Bashful Blue, Bordering Blue, Garden Green, Certainly Celery, Creamy Caramel and Close to Cocoa.

Tuesday, March 23, 2010

Aged Spring

I love love blues and reds together! I started this card by embossing the Bella Toile background on the 5 x 5 Bashful Blue card using More Mustard Craft ink and clear embossing powder. Then I painted in the images with the Frost White Shimmery paint and sponged the edges with vanilla craft ink and then a little bit of More Mustard Classic ink.
The center and flower on the flap are from the Embrace Life set and I colored those with Ruby Red, Old Olive and Regal Rose Markers. Then stamped them on the focal point and flap top which are both Whisper White C/S. I colored them in with a small amount of ink from my markers and an aqua painter. The saying is stamped with Basic Brown on Whisper white and cut out as well as the hummingbird. I cut slits on each side of the flap to insert the Bashful Blue satin ribbon. Each piece was sponged with Vanilla Craft ink and then More Mustard Classic ink. 
I really like the vanilla craft ink sponged onto Whisper white cardstock for an aged, vintage look. Try it! 

Monday, March 22, 2010

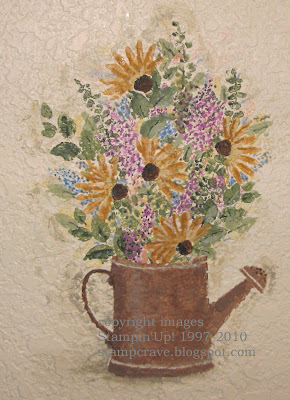
Wildflowers Mural

This is a mural I stamped and then painted in my master bath over the toilet! Ha....what a great place right? Well I stamped the images first using acrylic paint and then went back and painted them in and added shading, highlights and some detail. All of this was done with acrylic paints and small brushes and of course the stamps. I stamped the watering can first and waited for it to dry, then masked it off with tape and added the rest working my way up. I thought it would look better on a smooth wall but alas all my walls are textured so I decided to do it anyway! This mural is about 8 years old and super fun! Try it, you can always paint over it if it doesn't turn out! 


Definitely Decorative Wildflowers 1997
Remember this set anyone?
I have all my DD flowers, foliage and vines sets! I never know when I might need them! LOL

Gold on Gold

I wanted to try a gold on gold look and decided the watercolor crayons were the best choice on the Brushed Gold C/S background and after using my Stampin' Write markers to color in the flowers, I decided to cheat and use a couple of Copic Alcohol ink markers because the dye ink kept wiping off and was not soaking in as well as I liked.
I love to paint! I love to paint anything, in fact just re-painting my walls I look forward to so this week, I want to feature some things I have painted. I have found that any surface can be painted as long as you have the correct type of paint!
I also love altered things. Altered has really no boundries, it can be altered beyond recognition or altered in some small way that may change one thing! I love that altering turns 'something' into 'something different', or in my case, something I want to match what I've already got! Check back and I'll show you a few things I've painted!


Friday, March 19, 2010

The Paper Crafters Garden Birdhouse blog hop

These adorable box birdhouses are one of three patterns included in this month's Le Jardin sampler! The white flowered butterfly birhouse pictured above has a velcro tab on the side so it can be opened and a gift  placed inside. These boxes are so beautiful either stamped or made with just some decorative paper and accents! Offer something special to your customers and friends~ Subscribe today for the Paper Crafters Sampler you'll love the project ideas and patterns and don't forget to mention me~stampcrave or use code PCSCF

Check out Lisa's beautiful birdhouse!

Adorning Apron Blog Hop


I printed both these patterns smaller to fit on my regular and large sized cards. I looked for a stamp that would work as a dress stand bottom and came up with the 'F' from Vintage vogue and the cupcake stand. The Pretty paper for the dresses and the card backgrounds are from the Welcome Neighbor Paper stack and Sweet Pea Paper Pack. By creating a Satin ribbon and Pinking Hearts border ruffle, it gives each project a 3-d effect.
Welcome to this month's Adorning Aprons blog hop! The design team members are featuring our 'Adorning Apron' Pattern which you see above on these little dresses.
This month we have something extra for viewers. Each design team member will have a drawing for a FREE copy of the March Paper Crafters Sampler. Just leave your comments on our Adorning Aprons by March 3rd. The winners will be posted on March 4th.

This pattern along with other amazing projects can be found in this month's Le Jardin theme Paper Crafters Sampler. So if you would like this pattern and access to more wonderful projects and patterns, subscribe today to the Paper Crafters Sampler, click on the PCS widget on the left side of my blog which will take you right there and be sure to use code PCSCF to subscribe or mention me-stampcrave so that I will recieve credit! Thanks for stopping by~ To hop over to Melanie's blog, click below!

For the adorable Cinderella dress pattern click on the dress link!
                                                         Dress Link

Thursday, March 18, 2010

Box Inspired Card

Today's Card was inspired by a super cute box I saw and committed to memory! I wanted to make a card using the same colors and design. This turned out ok but not quite as well as my beautiful box living in my memory! LOL Oh well, it's Springy and Fun none the less! The background papers are from the Sweet Pea Paper stack using pastels-Pretty in Pink, Bashful Blue, Mellow Moss circles and So Saffron zig zag stripes. The flowers and leaves are all punched out of Pretty in Pink, Certainly Celery, So Saffron and Regal Rose Cardstocks. The leaves are sponged with Certainly Celery ink and the flowers are all sponged with Pretty in Pink ink. I attached the background paper to a white panel and then attached that to a Whisper White Card Base. The flower centers are Sweet Pea patterned paper with brown dots on pink paper punched out with the 1/4" circle punch. The Scallop Oval is stamped with Soft Suede ink using the Oval All stamp set and colored with pastel markers, then punched out with the Scallop oval punch. Pink Taffeta Ribbon is attached to the top of the scallop to complete the card.

Wednesday, March 17, 2010

Vintage blues

For this card I used paper from the Welcome Neighbor paper stack and Thoroughly Modern DS paper. The Brocade Blue 5/8" grosgrain ribbon goes so well with Bashful Blue. The butterfly centers are made with tiny slivers of Soft Suede C/S ~Stamps: Vintage Vogue, Very Vintage wheel. ~ Paper: Welcome Neighbor paper pack, Thoroughly Modern DS paper, Brocade Blue C/S, Whisper White C/S.~ Ink: Old Olive, Bashful Blue, Brocade Blue, White Craft Pad, Soft Suede. ~Accessories: Modern Label Punch, 1/16" circle punch, 1/4" circle punch for flower centers. Beautiful Wings embosslit die, Big shot, Vintage brads, Brocade grosgrain ribbon.

Saturday, March 13, 2010

PCS Sneek Peek Project Coming Monday!

The Paper Crafters Sampler Design Team will be having another Sneek Peek blog hop on Monday, March 15th. We will be featuring another adorable project that is available now-in the March Le Jardin Issue of Paper Crafters Sampler! Stay Tuned for this lovely project idea and for more information on how to subscribe click Here- Don't forget to mention me- Cherie or use code PCSCF
Paper Crafters Sampler Issues feature Stampin' Up! Stamps and products exclusively.

Easter Egg Trio

Spring and Easter together. Stamp sets used for this Card are A Good Egg and Chocolate Bunny.
Such a easy card with the bunny stamped on Close to Cocoa C/S with Chocolate Chip Craft ink and embossed with Clear Embossing Powder. The Egg outlines were stamped on So Saffron DS paper with Basic Brown and cut out. The Two-step Bird was punched out of Bashful Blue C/S and the edges sponged with Brocade Blue ink. The Branch was punched twice with Celery C/S and Chocolate Chip C/S and then just the stem layered over the Celery Branch. The Background paper and Modern Label are from the Sweet Pea Paper stack and the So Saffron background is the DS paper to match the eggs.The strip in the middle is from the Chocolate Chip DS paper. Pink Taffeta ribbon and Pretty in pink flower complete the bunny and the Sweet Pea stitched felt flowers and leaves complete the card!

Thursday, March 11, 2010

Elegant Egg

Elegant Eggs Stamp Set -Retired 2003- Here's a Blast from the Past! Anyone Remember this set? This set among many of my retired stamp sets, still gets used from time to time! Love this set of 4 Faberge Eggs. For the focal point egg, I stamped it on Shimmery white C/S with stazon black ink and then colored it with SU markers. I then stamped the image on a sticky sheet and cut out the image and placed it over the colored egg and removed the top backing, then  poured clear micro beads over the sticky sheet to coat just the image. It gives it such a nice depth of color! The card base is Rose Red and the layers are framed with Brushed Gold C/S. The background paper is Sweet Pea Paper Stack and the Greeting is from the All Holidays Stamp set. Stretchy Gold Cord and Pink Satin ribbon complete the card!
I love pulling out my favorite older stamp sets, they're like an old friend!

Wednesday, March 10, 2010

Framed Bird

For today's card I would call it my 'clean up' card. I was on a roll and decided to make one more card! You all know what I'm talking about! LOL....the stamping table has about a 3" x 3" small square of room left to stamp on and you know you need to clean it up before you can make another thing because you can't even find the tape at this point! Well, I didn't need much room because I pulled these things together that were to be used on another card or discarded and within reach! The bird doesn't match but thats ok because 'he' was already pre-made and handy! LOL-Now there's a good Challenge- A Clean Up Card!

Supplies: ~Stamps: Vintage Vogue. ~ Paper: Soft Suede, Bella Bleu DS Paper, Sweet Pea DS Paper, (oval die cut frame is Pink Pirouette C/S) Celery and Chocolate Chip C/S for the branch, Tea Party Ds Paper for the bird.
~ Inks: Soft Suede, Versa Mark ink for the Frame embossing. ~Accessories: Trio Flower Punch, 2-step Bird Punch, White Embossing Powder, Big Shot, Oval Scallop Frame die, Chocolate Chip Taffeta Ribbon, White Gel Pen, Sponge.

Tuesday, March 9, 2010

Shabby Chandelier

This was a class card showing the Wash Away technique. For this card I used the Grand Soiree Stamp set which as of January was retired from the Dormant List for lack of sales. I LOVE this set-definitely a keeper for me!  It coordinates so well with the Very Vintage wheel and who doesn't love Pink and Brown together!
The Vintage wheel was inked with Chocolate chip Classic ink and the Chandelier was stamped with Craft ink for a more even image on the watercolor paper. For information on the technique click Here!
This is also such a Quick and Easy Card!
Stamp Sets: Grand Soiree, Very Vintage Wheel, Teeny Tiny Wishes. ~ Paper: Pretty in Pink C/S, Chocolate Chip DS paper, Sweet Pea DS Paper Stack, Watercolor Paper. ~ Inks: Chocolate Chip Classic Pad, Chocolate Chip Craft Pad. ~ Accessories: Vintage brads, Chocolate chip striped ribbon, Modern Label Punch, Paper Piercing tool, Big Shot, Top Note Die, Sponge, Aqua Painter, Small container of water, Paper towel.

March 'Le Jardin' Paper Crafters Sampler

The March Issue of Paper Crafters Sampler 'Le Jardin' (The Garden) will be released March 10th.
The projects and patterns are fantastic with easy to follow directions and exclusive Patterns to use for workshops or just one of a kind gifts and cards! There truely is something for everyone in this sampler! For more information and a sneek peek at the Design Team Members projects- click HERE

This month each design team member gets to choose someone to recieve a FREE PASS to recieve the March Paper Crafters Sampler! I had a hard time choosing a winner among the 32 people who left such lovely comments on my Adorning Apron blog hop! THANK YOU everyone for taking the time to leave me a comment and participate!
And The Winner is........

Lisa Said...
Super Cute! Gorgeous work, as always!
March 1, 2010 12:24 pm

Congratulations Lisa! I will forward your information to Melanie and she will send you the link to recieve your FREE copy of the March Sampler! Enjoy!~
Now here is a Sneek Peek of one of my March Sampler Projects!

'Le Jardin' the Garden theme! Wow! The possibilities were endless with this theme to create anything having to do with 'The Garden'! The Design Team had so much fun with the projects! I had to use my Die Cut Daisies too! You don't want to miss out on these projects which are featured a month ahead to give you all the tools to prepare for workshops, stamp camps, classes or just stamping get togethers or if you just want great projects to make Hop over to the Paper Crafters Sampler check out all the Sneek Peeks and if you decide to subscribe use my code PCSCF or mention where you came from ~stampcrave
I know you'll love all the sampler has to offer!


Monday, March 8, 2010

Silhouette Style

Rich Browns and Pinks and Mauves look so good together! For today's card I started with the stripped background paper from the Sweet Pea Paper Stack which is so gorgeous!
One of my goals this catalog year was to incorporate more Designer Series paper into my Card Layouts. I have had a few of my ladies ask me about how to do this! So I try to create one out of the two projects a month using Designer Series Paper for my stamp groups. For those of you who have been stamping for more then a decade, you probably didn't use much background paper on your cards when you first started?......I know I didn't but sometimes a small change is all that is needed to challenge an advanced stamper or even yourself!  

The Pink Houndstooth paper is from the same paper stack and each piece was sponged and layered on Chocolate chip C/S. This was such a simple card, the focal point was stamped with Chocolate chip ink and then sponged with Certainly Celery and Pretty in Pink inks on Whisper White C/S. The embossed background was sponged with Chocolate Chip ink to pop out that raised texture. 
Card Supplies: Pocket Silhouettes, Whimsical Words. ~Paper: Pretty in Pink C/S, Certainly Celery C/S, Whisper White C/S, Sweet Pea Paper Stack. ~ Inks: Chocolate Chip pad, Pretty in Pink pad, Certainly Celery pad. ~ Accessories: Large Oval Punch, Wide Oval Punch, 1/16" Circle Punch, Sweet Pea Stitched felt flowers, Vintage Brads, Sponge, Big Shot, Finial Press Embossing folder.

Saturday, March 6, 2010

Top Note Easter Basket

Chocolate Bunnies and Decor Eggs in a Herringbone Basket. Herringbone Technique layered over the half  Top Note using Bella Bleu DS paper for the basket. I love this bunny stamped on Close to Cocoa C/S using Chocolate Chip Craft ink and embossed with clear powder. I punched out two flowers from another embossed bunny because I wanted the eggs to have a chocolate accent. The center of the pink flower on the bunny has beads from the Earth Elements (retired) Beads. The modern label greeting has a pink bead at each end.
I drew the basket handle and cut it out.
Supplies Used: Stamps: A Good Egg, Chocolate Bunny, Teeny Tiny Wishes. ~ Paper: Kraft C/S, Bella Bleu DS paper, Close to Cocoa C/S, Certainly Celery C/S, Pretty in Pink C/S. ~Ink: Basic Brown, Chocolate Chip craft pad, Soft Suede. ~Accessories: Modern Label Punch, Pink Beads, Heat Gun, Clear Embossing Powder, Pink Taffeta Ribbon, Trio Flower Punch, Big Shot, Top Note, Sponge.

Wednesday, March 3, 2010

Sympathy two-step bird

For today's card I used the 'sky' paper from the Welcome Neighbor paper pack with the Top Note die. It's very hard to see the pale blue and the picture just doesn't do the color justice! Oh well the top note is pale blue with Brocade Blue watercolored edges. I used the White Craft pad ink smeared liberally in the center of the top note and the center of the bird. The edges of the bird and wing are sponged with Brocade Blue as well as stamped using the Vintage Vogue stamp set with Brocade ink. To tie in the white base card, I sponged the edges with Bashful Blue ink. The branches are Old Olive C/S stamped over with Old Olive ink. I love these Colors together as you can see on my blog-LOL
There is just something about red, antique pale blue and green together!
Supplies: Thoughts and Prayers stamp set, Vintage Vogue stamp set~ Paper: Whisper white C/S, Real Red C/S, Welcome Neighbor Paper Pack, Old Olive C/S, Bashful Blue C/S. ~ Inks: Stazon Black, Old Olive, Brocade Blue, Chocolate Chip Marker, White Craft Pad. ~ Accessories: 2-step bird punch, Top Note die, Big shot, Red Satin Ribbon, White Gel Pen, Dots Embossing folder, Trio Flower Punch, Dimensionals, Aqua Painter.

Tuesday, March 2, 2010

Wash Away Roses

Today's Card uses that fabulous Wash Away technique. The Top Note die cut watercolor paper makes a great background for the wash away technique! With this card I used the Very Vintage wheel with Soft Suede Classic ink. To add texture to your base card, cut the cardstock long at 4 1/4" and then put one end of the card in one of our Beautiful embossing folders! To help 'pop' out the embossed texture, sponge over the raised image with a darker ink!

I stamped these roses and things on Whisper White C/S and cut them out. I do love to cut things out but if you are one of those who does not, you could improvise and stamp these beautiful roses directly on the top note and just cut out a couple of leaves to hang off the edge....

The wash away technique works best on water color paper. Stamp or wheel the image on watercolor paper and then drop water using your aqua painter over the entire surface and then blot it off. I really like the faded, soft look!
A Rose is A Rose stamp set, Real Red, Certainly Celery, Old Olive, Modern Label Punch, Red Satin Ribbon

Related Posts Plugin for WordPress, Blogger...